Transforming your kids’ play area into a fun, engaging, and safe environment doesn’t require a massive budget or extensive renovations. With something as simple and versatile as a tarp, you can easily breathe new life into outdoor playtime. Poly tarps, vinyl tarps, and custom tarps offer endless possibilities for creative projects that will keep your children entertained for hours. In this blog post, we’ll explore some innovative and practical ways to use tarps in children's play areas, ensuring a blend of fun, safety, and imagination.
1. Create a Durable Sandbox Cover
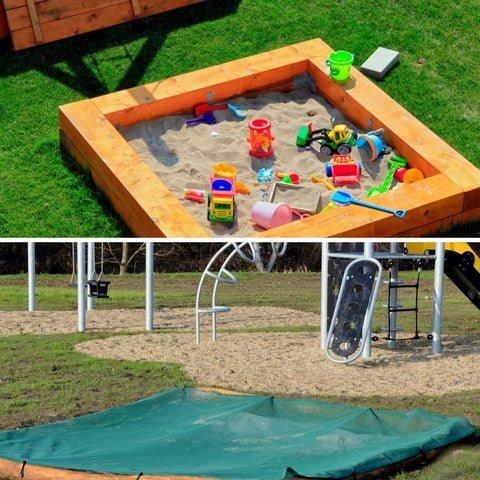
One of the simplest yet most effective ways to use a tarp is to create a sandbox cover. Sandboxes are a staple of childhood play, but they can also be a magnet for leaves, rainwater, and neighborhood cats. A custom tarp, cut and fitted to the size of your sandbox, can protect the sand from the elements and unwanted visitors. Opt for a vinyl tarp for its durability and water resistance. Ensure the tarp is securely fastened with hooks or weights to keep it in place, especially on windy days. This not only maintains the cleanliness of the play area but also extends the life of the sandbox.
Here’s a step-by-step guide to help you make a durable cover for your sandbox:
Materials Needed:
- Heavy-duty tarp large enough to cover your sandbox with extra margin on all sides
- Bungee cords or rope
- Scissors (if you need to cut the tarp to size)
- Grommet kit (optional, for adding extra grommets)
- Sandbags or weights (optional, for additional securing)
Instructions:
- Measure Your Sandbox: Measure the length and width of your sandbox. Add at least 2 feet to both measurements to ensure the tarp can cover the entire sandbox and have enough overhang on all sides. Make note of different industry sizing standards such as Cut Size and Exact Size or Full Finish when ordering your tarp.
- Select the Right Tarp: Choose a heavy-duty, waterproof tarp that's slightly larger than your measurements. Tarps with UV protection are beneficial for longevity.
- Cut to Size (If Necessary): If your tarp is too large, fold or cut it to fit. Leave enough extra material around the edges for securing it to the ground. However, cutting a tarp without the proper means or machinery to sew a hem is generally not advisable, especially when dealing with materials like vinyl and canvas, which are thick and challenging to sew by hand. The integrity of a tarp is significantly compromised when it is cut and left without a hem, as the hem plays a crucial role in reinforcing the fabric's edges. Without this reinforcement, the installation of grommets becomes problematic. Grommets inserted into an unhemmed edge are far more likely to tear through the fabric due to the lack of support. Therefore, to maintain the durability and functionality of the tarp, it is essential to have access to the appropriate equipment or techniques for sewing a strong, reliable hem before considering the placement of grommets. This precaution ensures that the tarp remains robust and serviceable, effectively extending its usability and protecting its contents.
- Add Grommets (Optional): If your tarp doesn’t have grommets or you need more, use a grommet kit to add them. Place grommets along the edges of the tarp, about every 2 feet, to help secure the cover more effectively.
- Secure the Tarp: Place the tarp over the sandbox, ensuring it covers the entire area and has equal overhang on all sides. Use bungee cords or rope to secure the tarp to the sandbox or nearby sturdy objects. If your sandbox has legs, you can tie the tarp directly to them.
- Add Weights (Optional): For extra security against wind, place sandbags or weights on the corners of the tarp or along the edges. This will help keep the tarp in place during windy conditions.
- Regular Checks and Maintenance: Frequently inspect the tarp for wear or damage, replacing it when needed. Following rainfall, ensure to clear any accumulated water to avoid sagging and pooling that may invite mosquitoes.
Tips for Longevity:
Always choose a tarp that’s designed for outdoor use and is made from durable, weather-resistant materials.
When not in use, store the tarp in a dry, shaded place to prevent sun damage and extend its lifespan.
Periodically clean the tarp with mild soap and water to remove dirt and debris.
This simple and effective solution will keep your sandbox clean and dry, ensuring it’s ready for play anytime.
Tarp Supply Inc. offers a specialized service for schools, daycare centers, and homeowners looking to protect their sandboxes from the elements and unwanted debris. The company can custom fabricate fitted sandbox covers using a variety of durable materials, including poly, mesh, and vinyl tarps. These covers can be tailored to perfectly fit the dimensions of any sandbox, ensuring a secure fit. Additionally, Tarp Supply Inc. provides the option to incorporate grommets or elastic shock cords in the hem of the covers, further enhancing the security and ease of use. This customization and attention to detail make their sandbox covers a popular choice among educational institutions and homeowners alike, providing a practical and reliable solution for sandbox maintenance and protection.
2. Design a DIY Slip-and-Slide
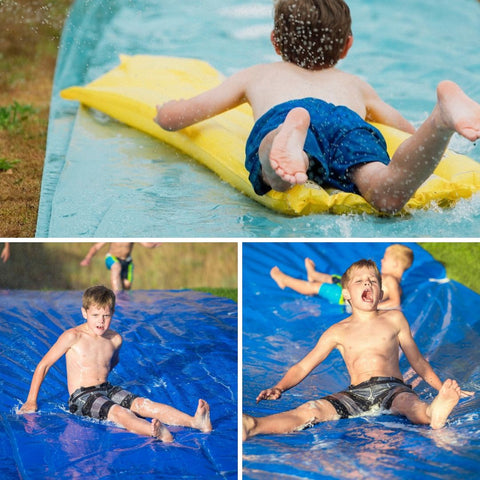
Nothing says summer fun like a slip-and-slide. With a long, durable poly tarp, you can create a cost-effective version right in your backyard. Poly tarps are perfect for this project due to their smooth surface and resistance to water. To set up your DIY slip-and-slide, lay the tarp on a gentle slope, secure it with stakes, and add a water source from a garden hose. For extra fun, use a mild soap solution to reduce friction and create a slippery surface. Always supervise children to ensure safety and prevent injuries.
Here's a step-by-step guide on how to make one using a tarp:
Materials Needed
- Large Tarp: A heavy-duty plastic tarp, preferably long and wide enough for sliding. The length can vary based on available space, but something around 100 feet long is great for all ages. If you don't have a single large tarp, you can use multiple tarps and secure them together.
- Garden Hose: To keep the tarp wet and slippery.
- Soap: Biodegradable soap to add extra slipperiness. Ensure it's safe for both your lawn and the participants.
- Stakes or Sandbags: To secure the tarp in place and prevent it from bunching up or flying away.
- Pool Noodles or Soft Foam: Optional, for lining the edges of the tarp to provide a soft barrier and prevent injuries.
- Sprinkler (Optional): For extra fun and to ensure the tarp stays wet.
Instructions
- Choose the Right Spot: Find a flat or slightly inclined area in your yard that’s free of rocks, sticks, and any debris that could puncture the tarp or injure sliders. A slight slope will make the slide more exciting.
- Spread the Tarp: Lay out the tarp on the selected spot. If you're using multiple tarps, overlap them by a few inches and use waterproof tape to secure them together from underneath.
- Secure the Tarp: Use stakes or sandbags to anchor the tarp at the corners and along the sides. Make sure it's stretched out and lays flat against the ground to avoid wrinkles or folds that could cause accidents.
- Add Pool Noodles (Optional): If using, place pool noodles or soft foam along the edges and secure them with waterproof tape. This creates a safer slide by preventing sliders from sliding off the sides.
- Wet the Tarp: Use the garden hose to completely wet the surface of the tarp. Keep the hose at the top of the slide or use a sprinkler to continuously spray water across the slide’s surface to keep it slippery.
- Apply Soap: Spread a thin layer of biodegradable soap over the tarp to make it extra slippery. Ensure it's evenly distributed but not too much to prevent bubbles from forming and potentially obscuring vision.
- Test the Slide: Before letting anyone slide, do a test run to ensure the slide is slippery enough and safely secured. Adjust as necessary.
- Safety First: Ensure all participants know how to slide safely (e.g., no standing up while sliding, no running starts that could lead to uncontrollable slides).
- Enjoy: Once everything is set up and safety is ensured, have fun sliding!
Maintenance and Safety
Regularly check the tarp for any damage or wear and tear.
Keep the slide wet at all times during use.
Monitor the usage to ensure everyone is playing safely.
Creating a DIY slip-and-slide with a tarp is a fantastic way to beat the heat and have fun with friends and family. Always prioritize safety and enjoy your homemade water park!
3. Craft a Weather-Proof Play Tent

A play tent or fort is a magical place for children, offering a space for imaginative play regardless of the weather. With a few poles or a sturdy frame and a large tarp, you can construct a weather-proof play tent. Vinyl tarps are ideal for this project because of their strength and ability to block out moisture. Customize your tent with windows and a door by cutting the tarp and sealing the edges. This cozy retreat can become a castle, spaceship, or secret clubhouse, giving your children a special place to play and dream.
Here’s a step-by-step guide to create one:
Materials Needed:
- 1 heavy-duty tarp (at least 10x12 feet) - for inside tents, untreated natural canvas tarps are a perfect alternative
- Paracord or strong rope (about 50 feet)
- 4 wooden stakes (12 inches long)
- 2 poles (about 5-6 feet tall; these can be wooden dowels, PVC pipes, or even sturdy branches)
- Hammer (for the stakes)
- Scissors (if you need to cut the rope)
Instructions:
- Find a Suitable Location: Choose a flat area that's free of sharp objects. The site should have some natural protection against wind if possible.
- Lay Out the Tarp: Spread the tarp on the ground to decide on the orientation of your tent. Consider the direction of the wind and the position of the sun during the day to maximize comfort.
- Create the Tent Structure:
- For an A-frame tent: Fold the tarp in half. Use the poles to prop up each end of the tarp, creating an "A" shape. The poles can be placed inside the fold of the tarp or outside, with the tarp corners tied to the top of each pole.
- For a lean-to tent: Attach one long edge of the tarp to two poles (or trees if available), creating a diagonal wall. Stake the opposite edge of the tarp to the ground.
- Tie the Corners: Use the paracord to tie each corner of the tarp to a stake. If using poles, ensure the tarp is securely tied to the top of each pole.
- Reinforce with Stakes: Drive stakes into the ground at each corner of the tarp, pulling the material taut to avoid sagging. Use additional stakes along the sides if necessary for extra wind resistance.
5. Adjust for Weather:
- For Rain: Make sure the tarp is angled to allow water to run off and not pool on top of the tent. Digging small trenches around the tent can help divert water away.
- For Wind: Secure the tarp with extra stakes or weights at the corners. Orient the tent so that the narrowest side faces the wind direction to minimize resistance.
6. Add Comfort Features:
Lay a groundsheet inside the tent for insulation and comfort. Bring in sleeping bags, pillows, and even a small, battery-operated fan for ventilation during hot weather.
Safety Tips:
- Always check the weather forecast before planning to spend time outdoors.
- Do not set up the tent near water bodies or under trees to avoid hazards.
- Ensure the tent is well-ventilated to prevent condensation and ensure a comfortable sleeping environment.
This DIY weather-proof play tent is not only cost-effective but also customizable to fit your specific needs, making it a great addition to any outdoor adventure or backyard playtime.
4. Set Up an Outdoor Art Studio

Encourage creativity and artistic expression by setting up an outdoor art studio with the help of a tarp. Lay a large poly tarp on the ground to define the studio area and protect the lawn or patio from spills and stains. Use another tarp as a giant canvas where kids can paint, or hang it up to create a splatter paint wall. This idea not only nurtures your child’s artistic side but also makes cleanup a breeze especially if using water-based paints. After the art session, you can simply hose down the tarps and fold them away for next time.
Here's a guide to help you create an inspiring and functional space outside:
- Choose the Right Location
Look for a flat, shaded area that's protected from strong winds. A backyard, garden, or a quiet spot in a park (if allowed) can be ideal. The place should offer enough natural light without direct sunlight that might damage your art materials.
- Select Appropriate Tarps
Opt for waterproof and UV-resistant tarps to protect your space and materials from the weather. Consider the size of the tarps based on the area you want to cover. You might need multiple tarps for the ground, overhead shelter, and wind protection.
- Create a Sheltered Workspace
Use sturdy poles, trees, or even the side of a building to secure the tarps. For overhead shelter, attach the corners of a tarp to poles or trees at a height that allows comfortable standing and movement. Ensure it slopes slightly for rainwater runoff.
For additional protection from wind and to create a more enclosed space, hang tarps from the sides. Leave one side open or partially open for easy access and ventilation.
- Secure the Tarps
Use ropes, bungee cords, or heavy-duty clips to secure the tarps to the supports. Make sure everything is tightly fastened to withstand wind. Place weights or sandbags at the bottom edges of the ground tarp and side tarps to keep them in place.
- Set Up Your Art Supplies
Organize your art supplies on portable tables or easels. Use storage containers that are weather-resistant to keep your materials safe. A rolling cart can be useful for easy access to your tools and supplies.
- Create a Comfortable Environment
Add a comfortable chair or stool, and consider a small table for your refreshments or personal items. Outdoor-friendly decor, like plants or wind chimes, can enhance the ambiance of your art studio.
- Plan for Lighting
If you plan to work during the early morning or late evening, consider adding outdoor lights. Battery-powered or solar LED lights can provide adequate illumination without the need for electrical outlets.
- Safety and Maintenance
Regularly check the stability of the setup, especially after bad weather. Keep your area clean and organized to prevent accidents. Always be mindful of local wildlife and use environmentally friendly materials whenever possible.
- Enjoy Your Outdoor Studio
Now that everything is set up, enjoy creating art in your new outdoor studio. The natural setting can offer unique inspiration and a refreshing change from indoor confines.
By following these steps, you can create a versatile and enjoyable outdoor art studio that takes advantage of natural light and scenery, while protecting you and your materials from the elements.
Conclusion
Revamping your kids' play area with a tarp is not only affordable and practical but also opens up a world of creative possibilities. Whether you’re crafting a sandbox cover, setting up a DIY slip-and-slide, creating a weather-proof play tent, implementing a safe fall zone, or establishing an outdoor art studio, tarps offer versatility and durability. By choosing the right type of tarp for each project—be it poly tarps, vinyl tarps, or custom tarps—you ensure that these fun additions to your child's play area are safe, engaging, and long-lasting. Remember, the ultimate goal is to create a space where your children can explore, imagine, and enjoy endless hours of play. With a little creativity and effort, tarps can help you achieve just that, making them an invaluable asset to any family’s outdoor play arsenal.


